When you wear a piece of custom jewelry, it is not simply metal and stones you are wearing; it is a story.
The story that starts with your dream and moves through the creative minds of designers, jewelers, setters, and polishers until it gets to you as a reality.
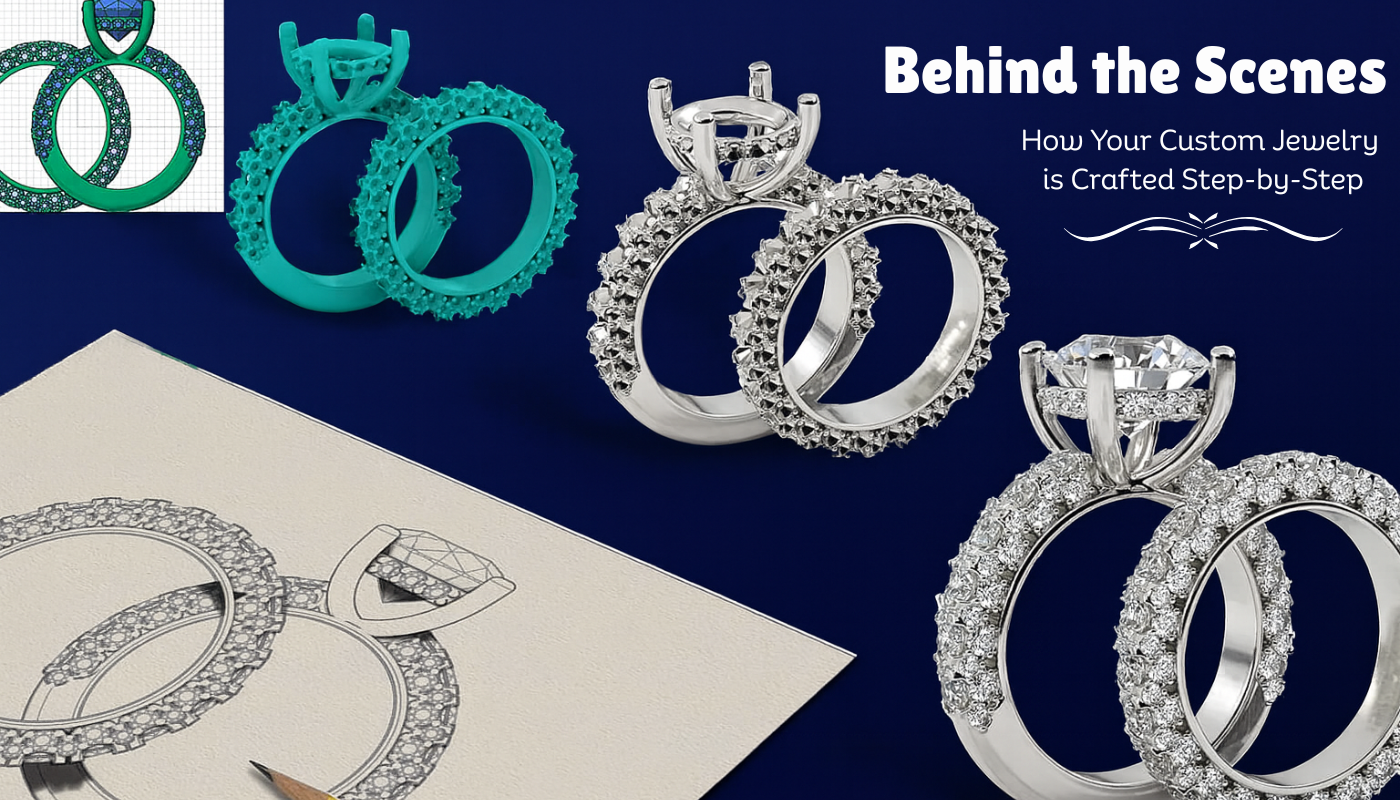
Step 1: CAD Design—Changing Your Dream Into a 3D Image

It all starts with your idea. If you have a clear vision or just an obscure concept, our designers will use Computer-Aided Design (CAD) software to materialize it.
⇒ Precision & Accuracy: With the help of CAD, we can come up with designs that are very accurate down to the smallest details. Each curve, angle, and setting is made in a proportionally perfect way.
⇒ Visualization: Before creating the jewelry, a three-dimensional view of your piece is given so that you can see it exactly as it is from each side.
⇒ Custom Adjustments: If you want the band just a little thinner or the central stone bigger, you can do it quickly and easily with us online, making a digital modification that saves time and material.
Step 2: Wax Model – The Physical Prototype is Assembled.

After getting your approval on the CAD, we proceed to wax modeling.
We employ a high-precision 3D printing or CNC milling technique to make a wax copy of your jewelry.
⇒ What Are Wax Models For: Essentially, this is the mold of your jewelry.
⇒ When Accuracy is taken into Consideration: Even the tiniest details in the CAD file are meticulously transferred into the wax model, thus ensuring that the prongs, engravings, and settings are in perfect alignment.
⇒ Client Previews: Sometimes, clients prefer to have the wax model in their hand and view it before we move on with the process.
Step 3: Casting—Bringing Metal to Life

Now the lost-wax casting process is performed, an ancient method of making jewelry by hand.
⇒ Investment Molding: The wax model is covered with a plaster-like material called investment.
⇒ Wax Burnout: The mold is heated, the wax is melted, and a hollow space is formed, which is an exact replica of your metal.
⇒ Molten Metal Pouring: The selected metals of gold, silver, platinum, or any other are first melted and then carefully poured into the mold.
⇒ Cooling & Release: The investment is removed by breaking the part that is around the metal, and thus the metal piece is exposed.
The casting step gives a new life to your design, and it becomes a tangible piece of art.
Step 4: Polishing—The First Touch of Brilliance

Once the metal jewelry is cast, it looks nothing like the radiant one of your imagination—it is raw, dull, and covered with residues. Polishing is the technique that helps the piece to shine again.
⇒ Initial Smoothing: Jewelers apply the files and rotary tools to get rid of casting marks and to make the surfaces smooth.
⇒ Pre-Polish: In this stage, the setting of the stone is prepared where the prongs and the channels are slightly polished so as not to be too smooth (to avoid the stone slipping).
⇒ Multiple Stages: We apply different compounds and use different wheels for the stages, and each stage brings more shine.
At this point, the preparatory work is done, such that the metal will look and feel luxurious.
Step 5: Stone Setting – Precision Meets Artistry

Installing diamonds or gemstones is the moment where the art of the craftsman is quite visible. Our master setters operate under the microscopes to place every single stone accurately.
⇒ Different Setting Styles:
Prong Setting – one of the most traditional, showing the stone to its advantages and raising it above the rest.
Bezel Setting – the metal completely encloses the stone making the setting stronger and safer for the wear and tear.
Pavé Setting – the small stones are set so closely that the smallest spaces between them are nearly invisible, which adds a sparkling effect to the setting.
⇒ Skill & Stability: Setting a stone properly not only adds to the beauty of the piece but, at the same time, it also helps in achieving security for a long time.
⇒ Customization: Clients can pick the nature, measurement, and layout of the stones — starting from cutting diamonds to which color of gemstones.
Step 6: Quality Check – Ensuring Perfection

Any piece before leaving the workshop has to undergo our multi-point quality audit process.
(We examine)
⇒ Stone security (no rattling settings)
⇒ Metal finish (no flaw or indentation)
⇒ Symmetry and proportion
⇒ Adherence to your initial design
⇒ Proper stamping for metal purity
Only after going through the inspection is it moved to the next stage.
Step 7: Packaging—The Final Reveal

The last stage is the presentation of the creation. What you have made is cleaned and polished to the very high standard and then get luxury packed.
⇒ Premium Boxes: They are lined with soft material and are elegant as well as protective.
⇒ Certificates: There might be certificates for diamonds or gemstones that come from the most reliable grading laboratories (e.g., GIA, IGI).
⇒ Personal Touch: In case it is a gift, engraving can be done or the wrapping might be different.
The feeling of getting the box out should be as special as wearing the jewelry for the first time.
Finale—Your Tale in Every Part
The moment you decide on a CAD jewelry will be custom-made for you right there under the showroom lights, and it will be a marriage of technology, art, and passion.
Anyway, we are there to support you on every step of the journey, so the eager hands, the milestone pendant, or the personal treasure can be handled with care, precision, and love.